How we created an in-house solution to animate likes and comments
Dilraj Singh16 Aug, 2022

At ShareChat and Moj, we are continuously striving to give our 400-plus million monthly active users the best experience they can have on the platform. One of the demands that we’ve frequently received was for animation in the form of flying hearts and flying emojis/reactions for live-streaming on the Moj app.
While every individual working on the problem had their idea for implementation, we needed to come up with a generalized solution to reduce development and testing time, and also give the developers the bandwidth to fine-tune the animations. In addition, we had to take care of performance simultaneously, as a responsive UI is much more engaging for the user. This blog will explain in detail about how we developed an in-house solution for implementing custom animations in jetpack compose at ShareChat.
The architecture is designed in a way to ease the development process without introducing extra states, animating an object will be as simple as calling a function with the necessary animation parameters like coordinates.
Jetpack compose brings a user-friendly API to animate an object from one destination to another using simple mathematics. Some of the APIs include animate(Float/Dp/Color)AsState, updateTransition(targetValue), rememberInfiniteTransition, and TargetBasedAnimation. More information can be found in the official documentation.
For example, if we want to animate a text from point A to point B on the screen, we can animate it using the following snippet -
1 2 3 4 5 6 7 8 9 10 11 12 13 14 15 16 17 18 19 20 21 22 23 24 25 26 27 28 29 30 31val height = with(LocalDensity.current) { LocalConfiguration.current.screenHeightDp.dp.toPx() } val position = remember { mutableStateOf(1) } val yOffset by animateFloatAsState( targetValue = if (position.value == 0) { height / 2 } else { height }, animationSpec = tween( durationMillis = 3000, easing = FastOutSlowInEasing ) ) Text( text = "hi", modifier = Modifier.offset { IntOffset(x = 200, y = yOffset.toInt()) } ) Button( onClick = { position.value = (position.value + 1) % 2 }, modifier = Modifier.align(Alignment.BottomCenter) ) { Text(text = "Animate") }
Additionally, we can customize the animation by providing an animationSpec, which will dictate how to interpolate the values of animation and the duration. For example, we have given tween as the spec which will linearly interpolate the values from the initial to the target value, according to the curve given in easing (FastOutSlowIn).
As we can see, the default behavior of jetpack compose animations is state-based. To make an object animate without a state, we have to use some low-level APIs like TargetBasedAnimation, with which we can control the raw interpolated values of the animation without the need for a state. This is explored later in the article.
Coming to the canvas side of things, to animate an object which is drawn using a canvas, we can use the interpolated values of the animation to draw that object at a particular location on the canvas with other parameters like color, rotation etc. (this is covered later on in the article). Following is an example of animating a canvas object in compose using state -
1 2 3 4 5 6 7 8 9 10 11 12 13 14 15 16 17 18 19 20 21 22 23 24 25 26 27 28 29 30 31 32 33 34 35 36 37 38 39 40 41val height = with(LocalDensity.current) { LocalConfiguration.current.screenHeightDp.dp.toPx() } val position = remember { mutableStateOf(1) } val yOffset by animateFloatAsState( targetValue = if (position.value == 0) { height / 2 } else { height }, animationSpec = tween( durationMillis = 3000, easing = FastOutSlowInEasing ) ) Canvas( modifier = Modifier.offset { IntOffset(x = 200, y = yOffset.toInt()) }, onDraw = { drawContext.canvas.nativeCanvas.drawText( text = "hi", x = 0f, y = 0f, paint = TextPaint().apply { color = Color.WHITE textSize = 84f } ) } ) Button( onClick = { position.value = (position.value + 1) % 2 }, modifier = Modifier.align(Alignment.BottomCenter) ) { Text(text = "Animate") }
Now let’s suppose we have to animate n number of objects in jetpack compose, we have the following 2 options -
- Either we animate ‘n’ number of objects (be it either composed elements or canvas) with each individual element having its own animation definition. This can be implemented using repeat (for loop) and draw the respective objects.
- Or we can have a single canvas, on which we can draw ‘n’ number of objects, with each individual element having its own animation definition.
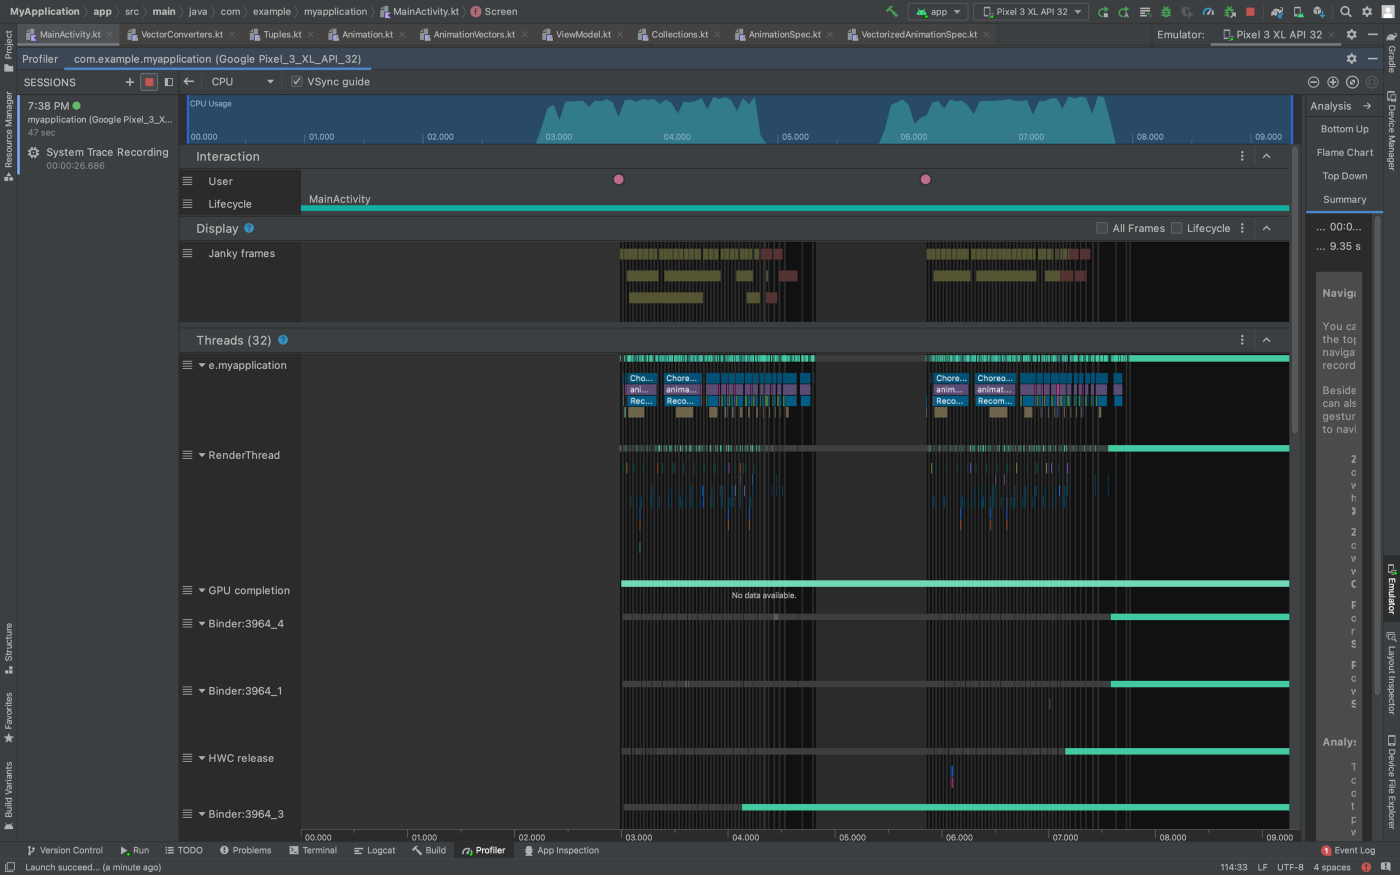
CPU usage analysis for option 1 as mentioned above, as we can see, CPU usage is nearly 100% (Screenshot taken from android studio profiler)
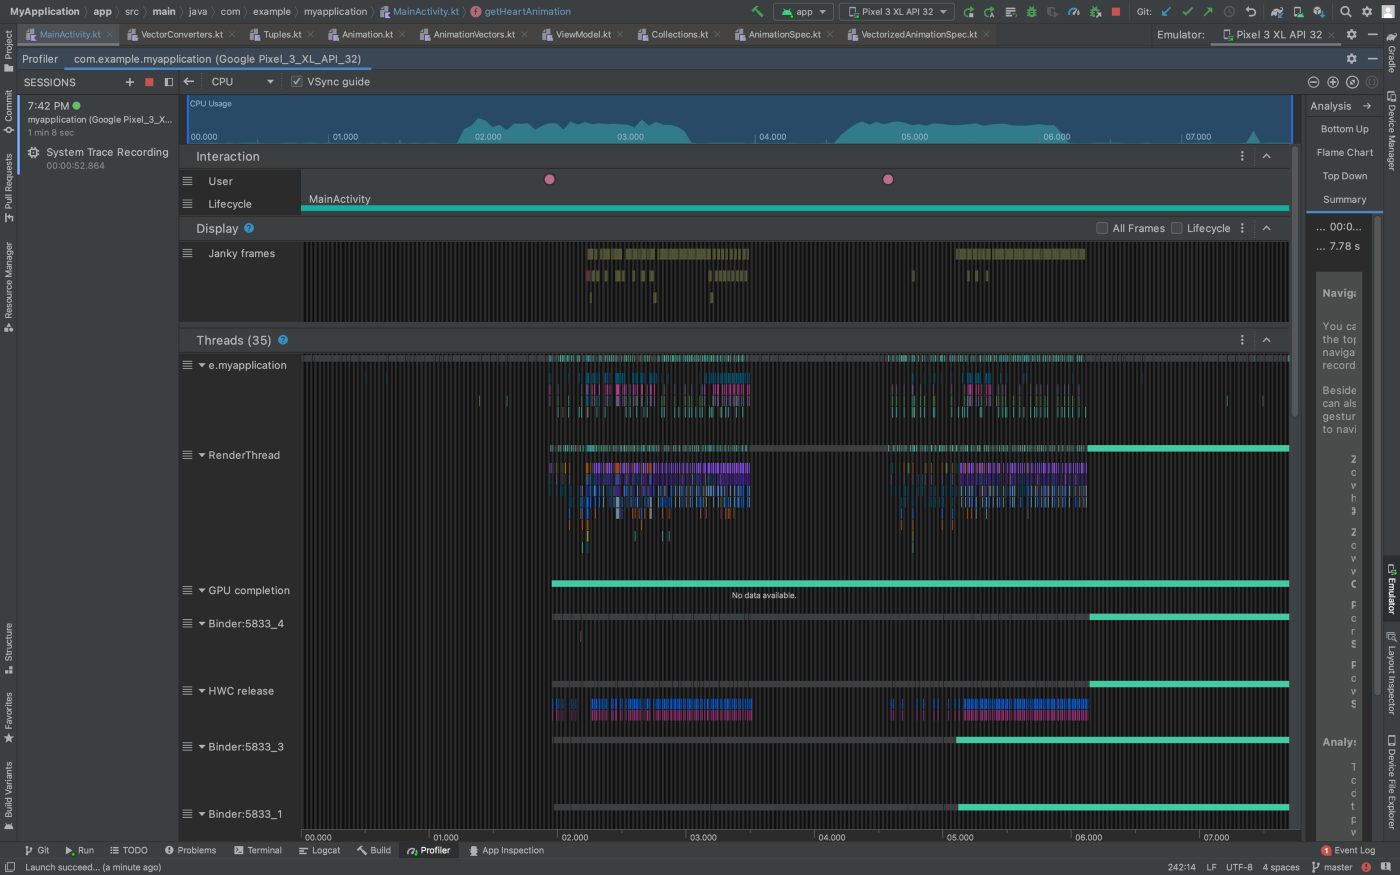
CPU usage analysis for option 2 as mentioned above, as we can see, CPU usage is hovering at ~50% (Screenshot taken from android studio profiler)
Both the options are animating 30 objects from bottom to top of the screen.
Clearly, option 2 is a more scalable approach, as animating ‘n’ number of objects will be very costly for the CPU as the number of objects increases and each object will require to be recomposed at a separate time as the animationSpec of that object will tick, thus increasing in a greater number of recompositions. This is evident from the above profiler report, the CPU utilization is higher for option 1, thus leading to more jank frames (marked with red denoting the deadline was missed for that frame). GPU performance should be more or less the same because it will have to draw the same number of objects in both cases.
We found this to be quite a good beginning point for implementing the first approach. We will now explain how to implement the second point in detail.
***
To begin with, let’s see how can we animate the drawing of an object on the canvas. We will be using the low-level API of Animation<T, V : AnimationVector>. The advantage of using this low-level API is that we can use the readily available animationSpec APIs like tween, spring, keyFrames, repeatable, infiniteRepeatable, snap. We use this to get the interpolated value of an object after a given duration, then we check the position where we have to draw the object, and in the canvas, we draw that object at that location. Let’s say for an example, we have to animate an object (heart shape in this example) along the x-axis, we can define an animation using the following code:
1 2 3 4 5 6 7 8 9TargetBasedAnimation( animationSpec = tween( durationMillis = 2500, easing = FastOutSlowInEasing ), typeConverter = Float.VectorConverter, initialValue = 0, targetValue = deviceWidth )
To draw the text at the given coordinates, we can use the translate API of canvas to go to that position and draw the object there:
1 2 3 4 5 6 7 8 9 10 11 12Canvas( onDraw = { translate(top = getInterpolatedY(), left = getInterPolatedX()) { drawContext.canvas.nativeCanvas.apply { drawPath( path = getHeartPath(), color = Color.Red ) } } } )
Now coming to the heart of the matter, how to calculate the interpolated values of coordinates to draw the object. The animation API exposes a method to get the interpolated value after a given duration of time. This API is as follows -
1fun getValueFromNanos(playTimeNanos: Long): T
Using this, we can check the value at a given time using the elapsed time in nano-seconds. In short, we can store a start time of the animation for that object, and then each time we can get the interpolated value using
1getValueFromNanos(System.nanoTime() — start_time_of_the_animation)
To get the interpolated value of the object, we have 2 options
- Calculate the position of the object at every fixed interval (for instance 10 milliseconds) and then update the canvas.
- Sync the update with every frame and update the position of the object at every frame.
Clearly, the second approach is the one to go forward with. The first approach will result in a jagged animation, as the 10 milliseconds delay might not sync with every frame. Moreover, this is not scalable as devices with higher frame rates continue to be launched, we will need to update our update threshold. To fix this, we will use a callback to check whenever a frame is displayed, and on every frame, we need to update the animated values. Kotlin provides a suspendable function withFrameMillis, which expects a lambda which will be called every time a frame is scheduled to be displayed. This internally uses the Choreographer.FrameCallback. So we will replace the delay function with withFrameMillis.
There is still one fatal flaw with the current implementation; we need a way to somehow stop the animation as and when it suits our use case; otherwise the animation will continue to go on forever (infinite recomposition). To do this, we can introduce a data class, namely ItemState to encapsulate the necessary information and to include a terminal condition as follows -
1 2 3 4 5 6 7 8 9 10 11 12 13 14data class ItemState( val x: Float, val y: Float, val xAnimation: Animation<Float, AnimationVector1D>, val yAnimation: Animation<Float, AnimationVector1D>, val time: Long = System.nanoTime(), val terminalCondition: ( interpolatedX: Float, interpolatedY: Float, elapsedTimeMillis: Float ) -> Boolean = { interpolatedX, interpolatedY, _ -> interpolatedX < 0 || interpolatedY < 0 } )
By default, we can keep the terminal condition to be when the item goes outside the bounds of the screen. The user can give their own terminal condition suiting their use case. The channel iterating over the items will check whether the terminal condition has been reached or not, and accordingly will remove them from the list. The following code demonstrates how we will remove the items once the animation is done -
1 2 3 4 5 6 7 8 9 10 11 12 13 14 15 16 17 18 19 20 21 22 23 24 25 26 27 28 29 30 31 32 33 34 35 36 37 38 39 40 41 42 43 44 45 46 47 48 49 50 51 52 53 54 55val itemsToAnimate = remember { mutableStateOf<List<ItemState>>(mutableListOf()) } val itemsChannel = remember { Channel<List<ItemState>>(Channel.UNLIMITED) } var job: Job? = remember { null } LaunchedEffect(true) { for (_items in itemsChannel) { job?.cancel() job = launch { withContext(Dispatchers.IO) { val items = _items.toMutableList() while (true) { withFrameMillis { val iterator = items.iterator() var index = 0 val itemsToBeRemoved = mutableListOf<ItemState>() while (iterator.hasNext()) { val element = iterator.next() //element is ItemState val elapsedTime = System.nanoTime() - element.startTime val newX = element.xAnimation.getValueFromNanos(counter) val newY = element.yAnimation.getValueFromNanos(counter) items.safeSet(index) { it.copy( y = newY, x = newX, ) } index++ if ( itemState.terminalCondition( newX, newY (elapsedTime / 1_000_000).toFloat() ) ) { itemsToBeRemoved.add(itemState) } } items.removeAll(itemsToBeRemoved) hearts.value = items.toMutableList() } if (hearts.value.isEmpty()) { job?.cancel() } } } } } }
To animate an object, we need to send the item object with the information containing the x and y animation to the channel, which will internally manage the animated values. Now that we have n items in their final state containing their coordinates, we can draw out all the objects on the canvas. We are using a separate channel to append new items so that the main thread does not have to wait for appending the new item in the list (producer-consumer problem here, we will buffer the events and send them one by one; notice itemsChannel and itemsToAnimate as previously mentioned in the article).
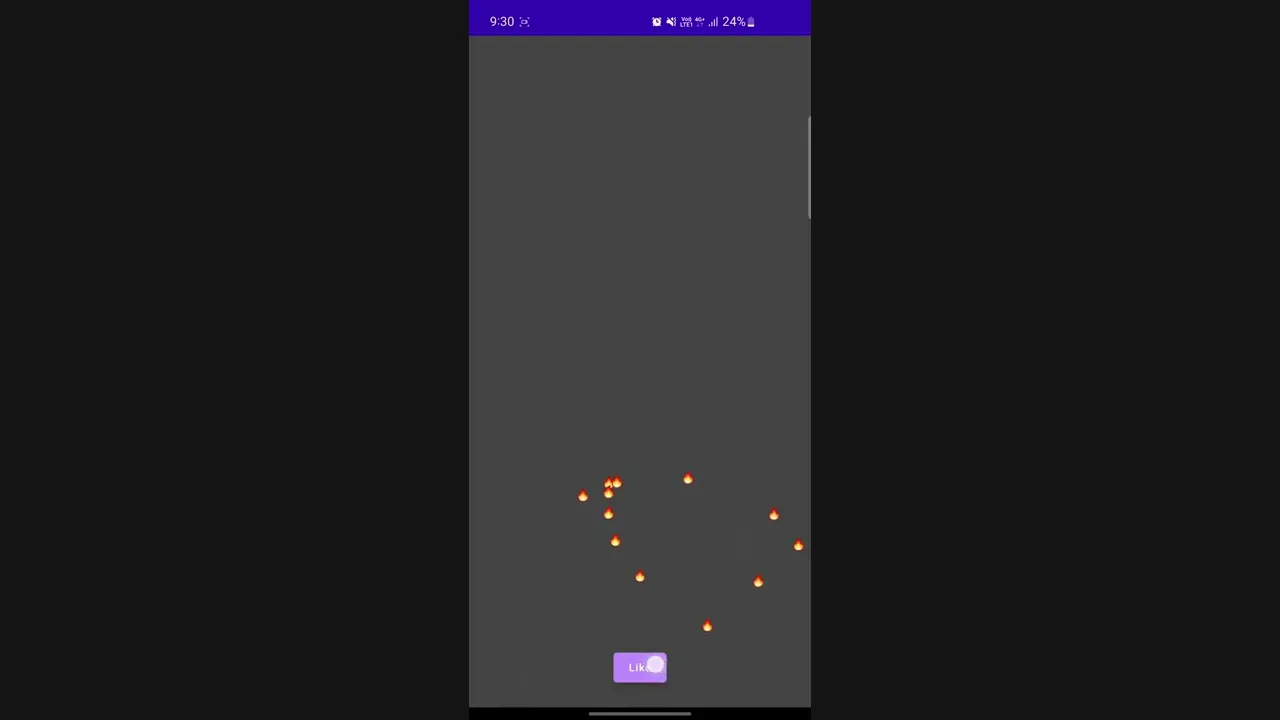
1 2 3 4 5 6 7 8 9 10 11 12 13 14 15 16 17 18 19 20 21 22 23 24 25 26 27 28 29 30 31 32 33 34 35 36 37 38 39 40 41 42 43 44 45 46 47 48 49 50val producerChannel = remember { Channel<List<ItemState>>(Channel.UNLIMITED) } LaunchedEffect(true) { for (incomingList in producerChannel) { launch(Dispatchers.IO) { itemsChannel.trySend(itemsToAnimate.value.toMutableList().apply { addAll(incomingList) }) } } } Button( onClick = { val randomX = Random.nextInt(0, (width).toInt()).toFloat() producerChannel.trySend( listOf( ItemState( x = randomX, y = height, xAnimation = TargetBasedAnimation( animationSpec = tween(durationMillis = 5500, easing = FastOutSlowInEasing), typeConverter = Float.VectorConverter, initialValue = randomX, targetValue = randomX ), yAnimation = TargetBasedAnimation( animationSpec = tween(durationMillis = 5500, easing = FastOutSlowInEasing), typeConverter = Float.VectorConverter, initialValue = height, targetValue = height / 2 ), ) ) ) }, modifier = Modifier .align(Alignment.BottomCenter) .padding(24.dp) .wrapContentHeight() .wrapContentWidth() ) { Text( text = "Like", color = Color.White ) }
1 2 3 4 5 6 7 8 9 10 11 12 13 14Canvas(modifier = modifier, onDraw = { for (item in itemsToAnimate) { translate(top = item.y, left = item.x) { drawContext.canvas.nativeCanvas.apply { drawPath( path = getObjectPath(), color = Color.Red ) } } } } )
***
That’s it! The basic API is ready to be used. Now we can introduce other parameters to be animated. This library currently supports animating the following parameters-
- xCoordinate
- yCoordinate
- Color
- Alpha
- Angle
- Scale
To extend the items that can be supported, we have created a sealed class namely ComposeCanvasDrawItem which can be extended by text or path or provide a custom implementation of the sealed class to draw anything custom. The canvas will handle the drawing part of the object according to angle and scale.
1 2 3 4 5 6 7 8 9 10 11 12 13 14 15 16 17 18 19sealed class ComposeCanvasDrawItem data class CanvasPath( val path: Path, ) : ComposeCanvasDrawItem() data class CanvasText( val text: String, val paint: TextPaint.() -> Unit ) : ComposeCanvasDrawItem() data class CanvasObject( val objectToDraw: DrawScope.( alpha: Float, angle: Float, color: Color, scale: Float ) -> Unit ) : ComposeCanvasDrawItem()
1 2 3 4 5 6 7 8 9 10 11 12 13 14 15 16 17 18 19 20 21 22 23 24 25 26 27 28 29 30 31 32 33 34 35 36 37 38 39 40 41 42 43 44 45 46 47 48 49 50 51 52 53 54 55 56 57 58 59 60 61 62 63 64 65 66 67 68 69 70 71 72 73Canvas(modifier = modifier, onDraw = { for (item in items) { translate(top = item.y, left = item.x) { drawContext.canvas.nativeCanvas.apply { when (val itemToDraw = item.itemToDraw) { is CanvasPath -> { scale( scale = item.scale, pivot = Offset( x = itemToDraw.path.getBounds().width / 2f, y = itemToDraw.path.getBounds().height / 2f ) ) { rotate( degrees = item.angle, pivot = Offset( x = itemToDraw.path.getBounds().width / 2f, y = itemToDraw.path.getBounds().height / 2f ) ) { drawPath( path = itemToDraw.path, color = item.color.copy(alpha = item.alpha) ) } } } is CanvasText -> { val textPaint = TextPaint().apply { itemToDraw.paint(this) color = android.graphics.Color.argb( 1, (item.color.red * 255).toInt(), (item.color.green * 255).toInt(), (item.color.blue * 255).toInt() ) alpha = (item.alpha * 255).toInt() } val bounds = Rect() textPaint.getTextBounds(itemToDraw.text, 0, itemToDraw.text.length, bounds) scale( scale = item.scale, pivot = Offset( x = bounds.width() / 2f, y = bounds.height() / 2f ) ) { rotate( degrees = item.angle, pivot = Offset( x = bounds.width() / 2f, y = bounds.height() / 2f ) ) { drawText( itemToDraw.text, 0f, bounds.height().toFloat(), textPaint ) } } } is CanvasObject -> { itemToDraw.objectToDraw(this@translate, item.alpha, item.angle, item.color, item.scale) } } } } } } )
Instead of directly building the ItemState object directly, we can use a builder pattern to specify the animations in sequence.
1 2 3 4 5 6 7 8 9 10 11 12 13 14 15 16 17 18 19 20 21 22 23 24 25 26class ItemStateBuilder( val composeCanvasDrawItem: ComposeCanvasDrawItem, val initialX: Float, val initialY: Float, val initialAlpha: Float = 1.0f, val initialAngle: Float = 0.0f, val initialColor: Color = Color.White, val initialScale: Float = 1.0f ) { internal var xAnimation: Animation<Float, AnimationVector1D>? = null internal var yAnimation: Animation<Float, AnimationVector1D>? = null internal var alphaAnimation: Animation<Float, AnimationVector1D>? = null internal var angleAnimation: Animation<Float, AnimationVector1D>? = null internal var colorAnimation: Animation<Color, AnimationVector4D>? = null internal var scaleAnimation: Animation<Float, AnimationVector1D>? = null internal var terminalCondition: (( interpolatedX: Float, interpolatedY: Float, interpolatedAlpha: Float, interpolatedAngle: Float, interpolatedColor: Color, interpolatedScale: Float, elapsedTimeMillis: Float ) -> Boolean)? = null }
Then we can have extension functions to build the actual object The actual implementation can be found in the GitHub repository. Following extension functions are currently present in the library -
1 2 3 4 5 6 7 8 9 10 11 12 13 14 15 16 17 18 19 20 21 22 23 24 25 26 27 28 29 30 31 32 33 34 35 36 37 38 39 40fun ItemStateBuilder.build(): ItemState fun ItemStateBuilder.animateY( to: ItemStateBuilder.() -> Float, animationSpec: ItemStateBuilder.() -> AnimationSpec<Float>, ): ItemStateBuilder fun ItemStateBuilder.animateY( to: ItemStateBuilder.() -> Float, animationSpec: ItemStateBuilder.() -> AnimationSpec<Float>, ): ItemStateBuilder fun ItemStateBuilder.animateX( to: ItemStateBuilder.() -> Float, animationSpec: ItemStateBuilder.() -> AnimationSpec<Float>, ): ItemStateBuilder fun ItemStateBuilder.animateSize( to: ItemStateBuilder.() -> Float, animationSpec: ItemStateBuilder.() -> AnimationSpec<Float>, ): ItemStateBuilder fun ItemStateBuilder.animateAngle( to: ItemStateBuilder.() -> Float, animationSpec: ItemStateBuilder.() -> AnimationSpec<Float>, ): ItemStateBuilder fun ItemStateBuilder.animateColor( to: ItemStateBuilder.() -> Color, animationSpec: ItemStateBuilder.() -> AnimationSpec<Color>, ): ItemStateBuilder fun ItemStateBuilder.animateAlpha( to: ItemStateBuilder.() -> Float, animationSpec: ItemStateBuilder.() -> AnimationSpec<Float>, ): ItemStateBuilder fun ItemStateBuilder.terminalCondition( terminalCondition: ( interpolatedX: Float, interpolatedY: Float, interpolatedAlpha: Float, interpolatedAngle: Float, interpolatedColor: Color, interpolatedScale: Float, elapsedTimeMillis: Float ) -> Boolean ): ItemStateBuilder
And here are some examples -
Now to animate a text object, we can specify the parameters in a chain. Below mentioned are some examples of the code and the corresponding videos.
1 2 3 4 5 6 7 8 9 10 11 12 13 14 15 16 17 18 19 20 21 22 23 24 25 26 27 28 29 30 31 32 33 34 35 36 37 38 39 40 41 42 43 44 45 46 47 48 49 50 51 52 53 54 55 56 57 58 59 60 61 62 63 64 65 66 67 68 69 70 71 72 73 74 75 76 77 78 79 80 81 82 83 84 85 86 87 88 89 90 91 92producerChannel.trySend( List(10) { getItemCircleLoader(width, height, (it * 100)) } ) fun getItemCircleLoader(width: Float, height: Float, initialDelay: Int = 0) = ItemStateBuilder( composeCanvasDrawItem = getTextCanvasObject(), initialX = (width / 2 - 400f), initialY = (height / 2 + 0f), ) .animateX( to = { initialX }, animationSpec = { repeatable( iterations = 10, animation = keyframes { durationMillis = 8000 (width / 2) - 400f at 0 with InverseCosineEasing (width / 2) at 1000 with SineEasing (width / 2) + 400f at 2000 with InverseCosineEasing (width / 2) at 3000 with SineEasing (width / 2) - 400f at 4000 with InverseCosineEasing (width / 2) at 5000 with SineEasing (width / 2) + 400f at 6000 with InverseCosineEasing (width / 2) at 7000 with SineEasing (width / 2) - 400f at 8000 with InverseCosineEasing }, initialStartOffset = StartOffset(initialDelay) ) } ) .animateY( to = { initialY }, animationSpec = { repeatable( iterations = 10, animation = keyframes { durationMillis = 8000 (height / 2) at 0 with SineEasing (height / 2) - 400f at 1000 with InverseCosineEasing (height / 2) at 2000 with SineEasing (height / 2) + 400f at 3000 with InverseCosineEasing (height / 2) at 4000 with SineEasing }, initialStartOffset = StartOffset(initialDelay) ) } ) .animateAngle( to = { 360f }, animationSpec = { repeatable( iterations = 10, animation = keyframes { durationMillis = 8000 0f at 0 with LinearEasing 360f at 4000 with LinearEasing }, initialStartOffset = StartOffset(initialDelay) ) } ) .terminalCondition { _, _, _, _, _, _, elapsedTimeMillis -> elapsedTimeMillis > 80000 + initialDelay } .animateColor( to = { Color.Green }, animationSpec = { repeatable( iterations = 10, animation = keyframes { durationMillis = 8000 Color.Green at 2000 with LinearEasing initialColor at 4000 with LinearEasing Color.Red at 6000 with LinearEasing initialColor at 8000 with LinearEasing }, initialStartOffset = StartOffset(initialDelay) ) } ) .build()
We are sending one item to the producerChannel at a time -
1 2 3 4 5 6 7 8 9 10 11 12 13 14 15 16 17 18 19 20 21 22 23 24 25 26 27 28 29 30 31 32 33 34 35 36 37 38 39 40 41 42 43 44 45 46 47 48 49 50 51 52 53 54ItemStateBuilder( composeCanvasDrawItem = getPathCanvasObject(), initialX = Random.nextInt(0, (width).toInt()).toFloat(), initialY = (height - 200f), ) .animateX( to = { initialX }, animationSpec = { SinWaveAnimationSpec(durationMillis = 3500, multiplier = 100) } ) .animateY( to = { height / 2 }, animationSpec = { tween(durationMillis = 3500, easing = FastOutSlowInEasing) } ) .animateAlpha( to = { 0f }, animationSpec = { tween(durationMillis = 5500, easing = LinearEasing) } ) .animateAngle( to = { 1440f }, animationSpec = { tween(durationMillis = 2500, easing = FastOutSlowInEasing) } ) .animateColor( to = { Color.Green }, animationSpec = { tween(durationMillis = 2000) } ) .animateSize( to = { 2.0f }, animationSpec = { spring(dampingRatio = Spring.DampingRatioHighBouncy) } ) .build()
1 2 3 4 5 6 7 8 9 10 11 12 13 14 15 16 17 18 19 20 21 22 23 24 25 26 27 28 29 30 31 32 33 34 35 36 37 38 39 40 41 42 43 44 45 46 47 48 49 50 51 52const val G = -9.8f // we are sending one item to the producerChannel at a time val xVelocity = Random.nextInt(-50, 50) val yVelocity = 100 // Random.nextInt(0, 200) return ItemStateBuilder( composeCanvasDrawItem = getTextCanvasObject("\uD83D\uDD25"), initialX = width / 2, initialY = (height - 500f), ) .animateX { object : Animation<Float, AnimationVector1D> { override val durationNanos: Long get() = Long.MAX_VALUE override val isInfinite: Boolean get() = true override val targetValue: Float get() = 0f override val typeConverter: TwoWayConverter<Float, AnimationVector1D> get() = Float.VectorConverter override fun getValueFromNanos(playTimeNanos: Long): Float { return initialX + (xVelocity * playTimeNanos / 100_000_000).toFloat() } override fun getVelocityVectorFromNanos(playTimeNanos: Long): AnimationVector1D { return Float.VectorConverter.convertToVector(targetValue) } } } .animateY { object : Animation<Float, AnimationVector1D> { override val durationNanos: Long get() = Long.MAX_VALUE override val isInfinite: Boolean get() = true override val targetValue: Float get() = 0f override val typeConverter: TwoWayConverter<Float, AnimationVector1D> get() = Float.VectorConverter override fun getValueFromNanos(playTimeNanos: Long): Float { val time = playTimeNanos / 100_000_000f return initialY - ((yVelocity * time) + (0.5 * G * (time * time))).toFloat() } override fun getVelocityVectorFromNanos(playTimeNanos: Long): AnimationVector1D { return Float.VectorConverter.convertToVector(targetValue) } } } .terminalCondition { _, interpolatedY, _, _, _, _, _ -> interpolatedY > height } .build()
We are hiring!
At ShareChat, we believe in keeping our Bharat users entertained in their language of preference. We are revolutionizing how India consumes content and the best in class Engineering technology is at the forefront of this transformation. In addition, you'll also get the opportunity to work on some of the most complex problems at scale while creating an impact on the broader content creation ecosystem.
Exciting? You can check out various open roles here!
Illustrations - Ritesh Waingankar